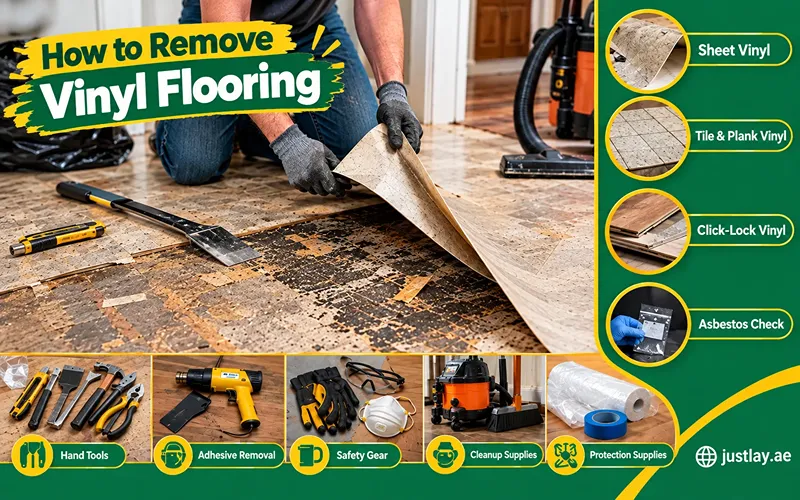
Old vinyl flooring has a way of showing its age. Edges curl, seams split, and patterns that looked fresh years ago start to feel dated. When it’s time for a new floor, the old one has to come up first.
The good news is that most homeowners can handle this job themselves. With the right tools, a bit of patience, and a clear plan, you can pull up old vinyl and leave behind a clean subfloor that’s ready for whatever comes next.
This guide explains how to remove vinyl flooring from start to finish. You’ll learn which tools to gather, how to prepare the room, how to deal with stubborn glue, and which mistakes cost people the most time.
First, Identify What Kind of Vinyl You Have
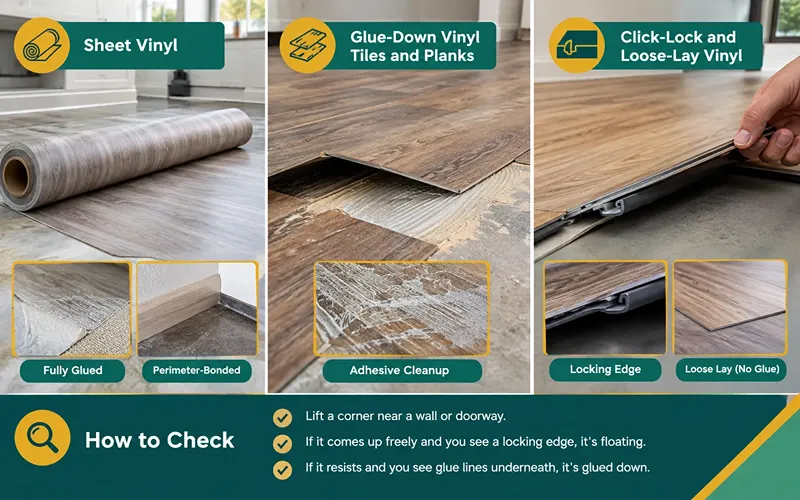
How your vinyl was installed matters more than what it looks like. The installation method decides how hard the job will be and which techniques work best.
Sheet Vinyl
This type of flooring in Dubai comes in large rolls, often 12 feet wide, with few or no seams. It’s usually either fully glued to the floor or glued only around the edges (called perimeter-bonded). Perimeter-bonded sheets are the easiest vinyl floors to remove.
Glue-Down Vinyl Tiles and Planks
These are individual pieces stuck to the subfloor with adhesive. Older peel-and-stick tiles fall into this group too. Expect more scraping and adhesive cleanup.
Click-Lock and Loose-Lay Vinyl
Modern luxury vinyl planks often “float” over the subfloor. They lock together at the edges or stay in place through weight and friction. There’s usually little or no glue, so removal is fast and the planks can sometimes be reused.
To check, lift a corner near a wall or doorway. If it comes up freely and you see a locking edge, it’s floating. If it resists and you see glue lines underneath, it’s glued down.
Check for Asbestos Before You Begin
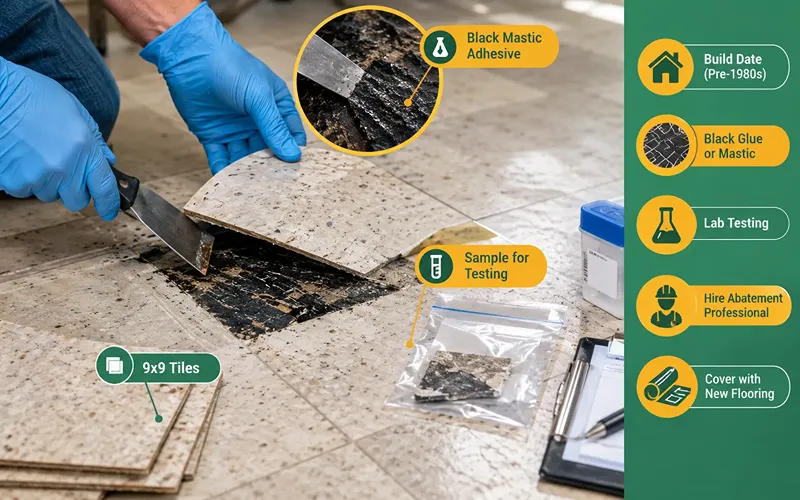
This is the most important step, and it’s the one many people skip.
Vinyl flooring and the black adhesive used beneath it (often called cutback or black mastic) were commonly made with asbestos until the early 1980s. Old 9×9-inch tiles are a common warning sign. Asbestos is harmless when left undisturbed, but cutting, scraping, sanding, or heating it can release fibers that cause serious lung disease.
If your home was built or last renovated before the mid-1980s, or you find black, tar-like glue under the vinyl, don’t start removal. Send a small sample to an accredited lab for testing first. Kits are inexpensive and results usually come back within a few days.
If the test comes back positive, hire a licensed abatement professional. In many cases, covering the old floor with new flooring is also a safe and legal alternative.
Tools and Materials Needed
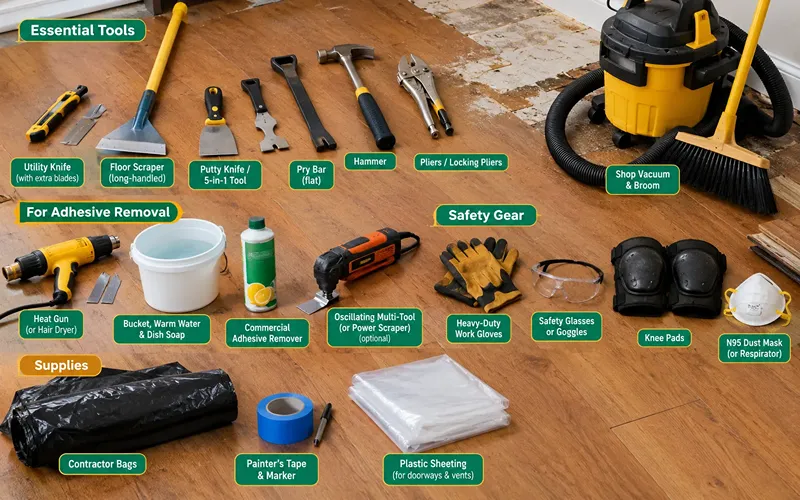
Having everything ready before you start keeps the job moving. Here’s what you’ll need.
Essential Tools
- Utility knife with extra blades: Vinyl dulls blades quickly, so change them often.
- Long-handled floor scraper: Saves your back and gives you better leverage than a hand tool.
- Stiff putty knife or 5-in-1 tool: For tight corners and small stuck sections.
- Flat pry bar and hammer: For removing baseboards, trim, and thresholds.
- Pliers or locking pliers: Help you grip and pull narrow strips.
- Shop vacuum and broom: For cleanup between stages.
For Adhesive Removal
- Heat gun or hair dryer: Softens glue under stubborn sections.
- Bucket, warm water, and dish soap: A gentle first option for residue.
- Commercial adhesive remover: Choose a low-odor, citrus- or soy-based product where possible.
- Oscillating multi-tool or power scraper (optional): Worth renting for large rooms or fully glued floors.
Safety Gear
- Heavy-duty work gloves
- Safety glasses or goggles
- Knee pads
- An N95 dust mask (a respirator if using chemical removers)
Supplies
- Heavy-duty contractor bags
- Painter’s tape and a marker for labeling trim
- Plastic sheeting to protect doorways and vents
How to Prepare the Room
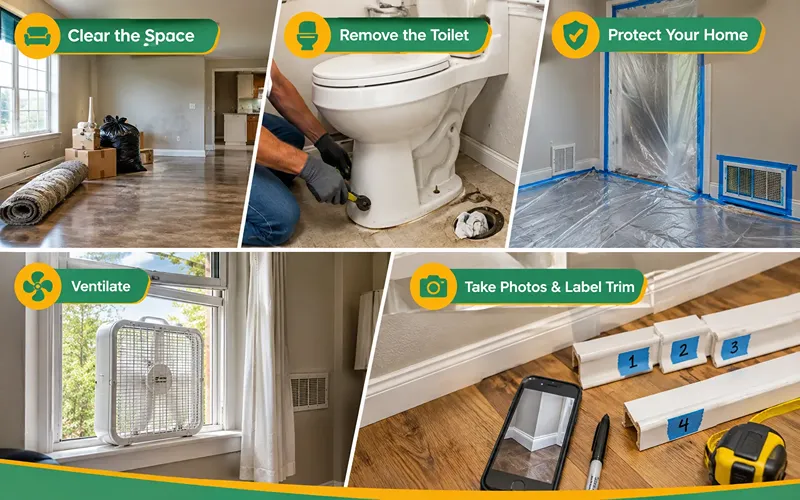
Good preparation makes the actual removal quicker and cleaner.
Clear the space completely. Take out all furniture, rugs, and décor. In kitchens and laundry rooms, you may also need to move appliances. Disconnect power and gas properly, and shut off water supply lines before moving a dishwasher, fridge with an ice maker, or washing machine.
Remove the toilet if needed. In bathrooms, vinyl often runs under the toilet. Turn off the water, drain the tank and bowl, and unbolt the toilet. Stuff a rag in the drain opening to block sewer gas and stop debris from falling in.
Protect the rest of your home. Hang plastic sheeting over doorways and cover floor or wall vents. Turn off your HVAC system so dust isn’t pulled through the ducts.
Ventilate. Open windows and set up a box fan pointing outward. This matters most if you plan to use a heat gun or chemical adhesive remover.
Take photos and label trim. Before pulling baseboards, snap a few pictures and number each piece with tape. Reinstalling trim is much easier when you know exactly where each piece goes.
How to Remove Vinyl Flooring Step by Step
Once the room is clear and safe, follow these steps. The process is similar for most floors, with a few differences noted for click-lock planks.
Step 1: Remove Baseboards, Trim, and Thresholds
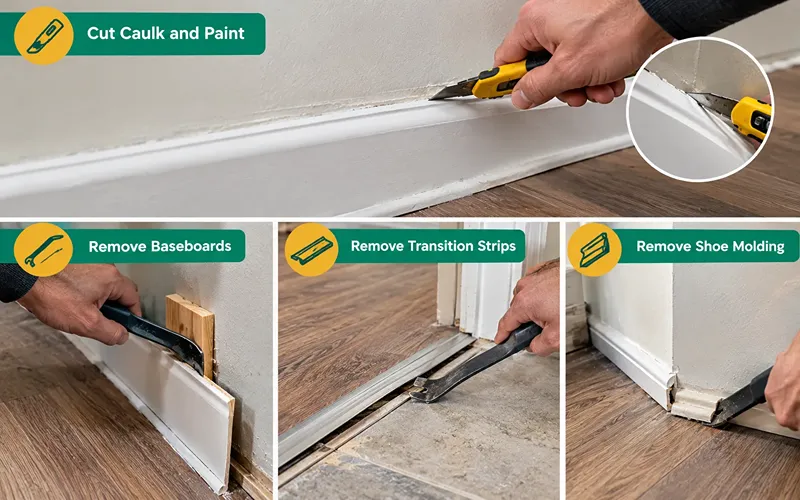
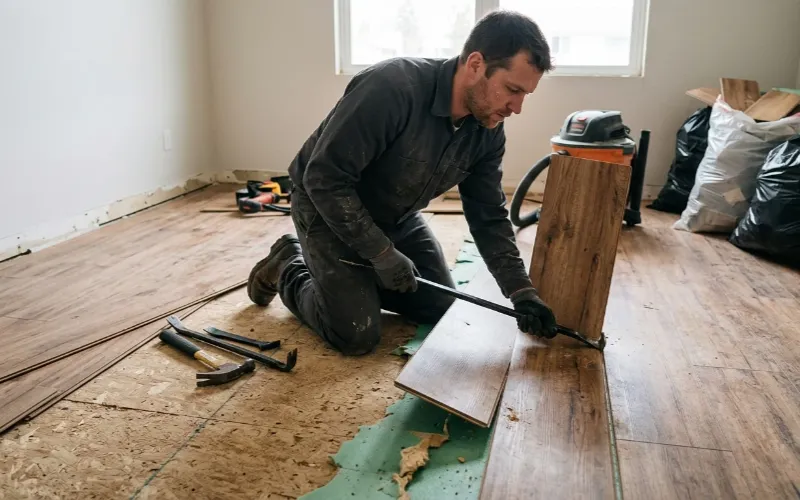
Run a utility knife along the top edge of the baseboard to cut through any caulk or paint. Slide a putty knife behind the board, then work the pry bar in and gently pull it away from the wall. Use a thin piece of wood behind the pry bar to protect the drywall.
Also remove transition strips at doorways and any shoe molding. This gives you full access to the edges of the vinyl.
Step 2: Find Your Starting Point
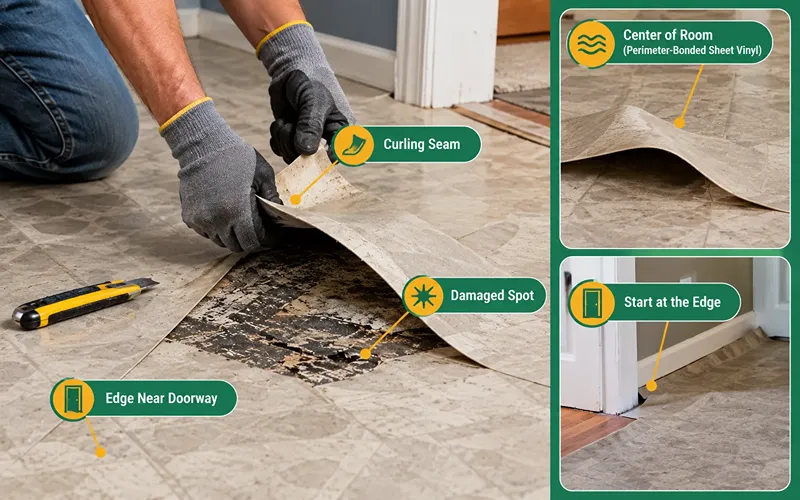
Start where the vinyl is already loose. A curling seam, a damaged spot, or an edge near a doorway usually works well. For perimeter-bonded sheet vinyl, the center of the room is often loose, so you can start there and work outward.
Step 3: Cut Sheet Vinyl Into Strips
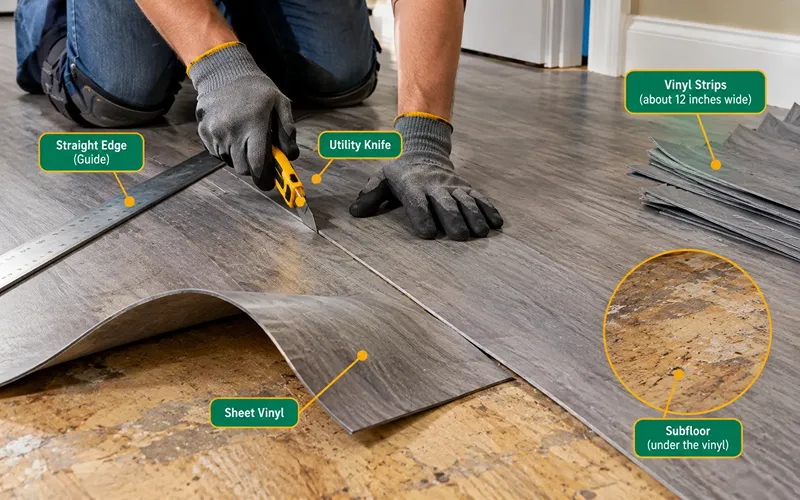
Don’t try to pull up an entire sheet at once. Large pieces are heavy, awkward, and more likely to tear unevenly.
Use your utility knife to cut the sheet into strips about 12 inches wide. Cut firmly enough to go through the vinyl, but try not to gouge the subfloor, especially if it’s plywood you plan to keep.
Step 4: Peel and Roll Each Strip
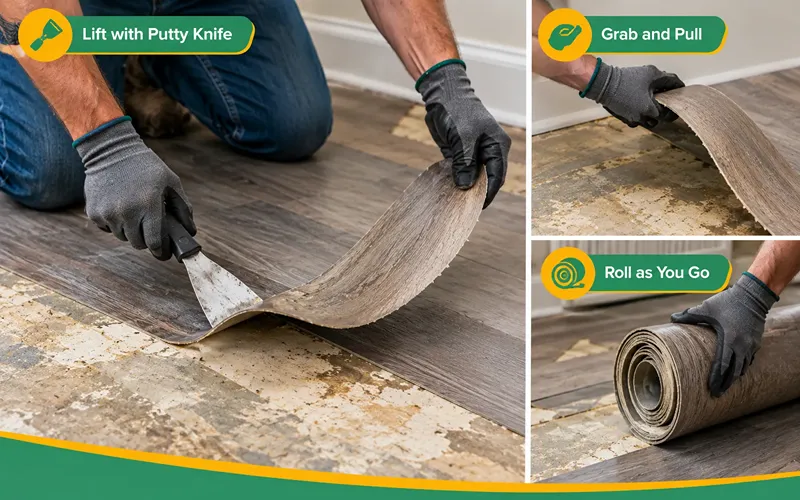
Lift the end of a strip with a putty knife, grab it with your hand or pliers, and pull back slowly at a low angle. Roll the strip up as you go. This keeps it manageable and makes disposal easier.
Pulling slowly and steadily helps the backing come up with the vinyl instead of tearing away and staying stuck to the floor.
Step 5: Scrape Up Glued Tiles and Tough Sections
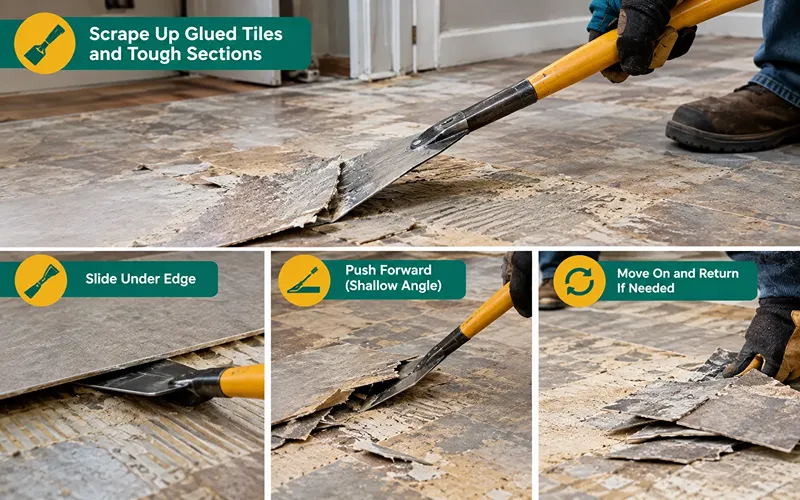
For glue-down tiles, planks, or fully adhered sheets, slide your long-handled scraper under the edge. Push forward at a shallow angle, using short, firm strokes. Keep the blade sharp and flat to avoid digging into the subfloor.
If a section refuses to budge, move on and come back to it later using the adhesive techniques below.
Step 6: Remove Click-Lock or Floating Planks
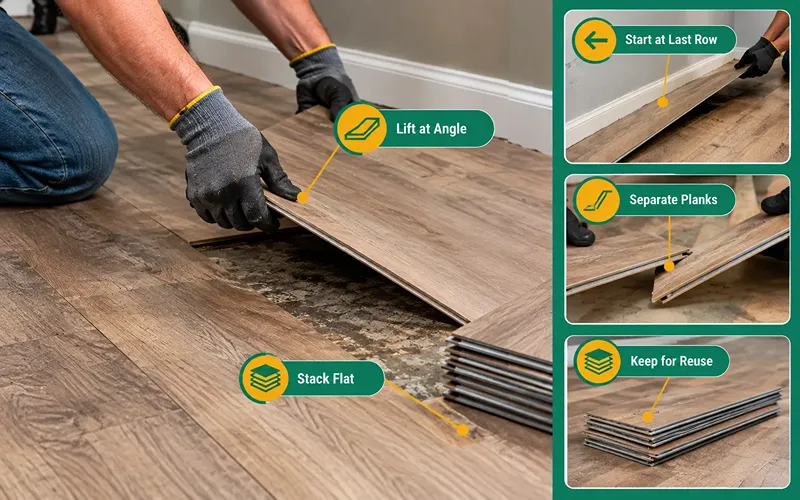
Floating floors come up in reverse order of installation. Start at the wall where the last row was installed, which is usually opposite the wall where installation began.
Lift the first plank at an angle to release the locking edge. Then lift the entire row, and separate the planks by angling them apart. If you want to reuse the planks, work gently and stack them flat.
Step 7: Deal With the Underlayment
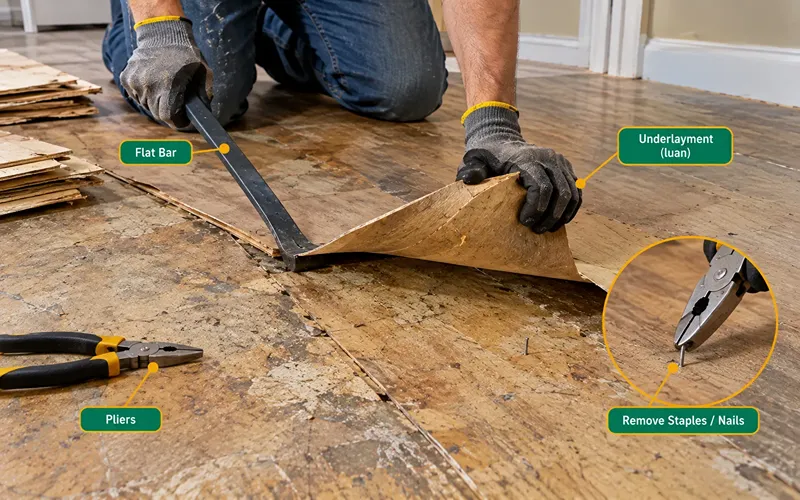
Some vinyl sits on thin plywood underlayment (often called luan) that’s stapled or nailed down. If it’s damaged, glued, or uneven, it’s often easier to remove it than to clean it.
Pry it up in sections with a flat bar, then pull out every remaining staple or nail with pliers. Leftover fasteners can poke through and damage your new flooring.
How to Remove Adhesive or Stubborn Sections
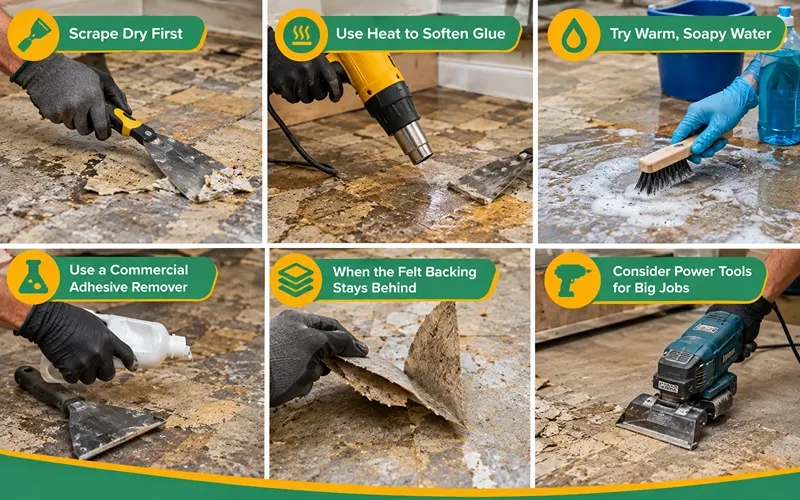
Adhesive is usually the most time-consuming part of vinyl floor removal. Start with the gentlest method and move up only when needed.
Scrape Dry First
Many types of glue will chip or flake off with a sharp scraper alone, especially older, brittle adhesive. Try this before adding heat, water, or chemicals.
Use Heat to Soften Glue
A heat gun on a low or medium setting softens most vinyl adhesives. Hold it a few inches above the surface and move it slowly back and forth for 30 to 60 seconds. Then scrape while the glue is warm and pliable.
Keep the heat moving so you don’t scorch the subfloor. Never use heat near anything flammable, and never on black adhesive that hasn’t been tested for asbestos.
Try Warm, Soapy Water
Mix warm water with a squirt of dish soap and spread a thin layer over the residue. Let it sit for 10 to 15 minutes, then scrape.
On concrete, very hot water works even better. On plywood or other wood subfloors, use as little water as possible and wipe up excess right away. Wood swells and can develop mold when soaked.
Use a Commercial Adhesive Remover
For glue that won’t respond to heat or water, use a remover made for flooring adhesive. Apply it according to the label, allow the recommended dwell time, and scrape. Wear gloves, ventilate well, and check that the product won’t interfere with the adhesive for your new flooring.
When the Felt Backing Stays Behind
Sometimes the vinyl top layer pulls away and leaves its paper or felt backing glued to the floor. Lightly mist the backing with warm water, wait a few minutes, then scrape. The moisture softens the paper and makes it release more easily.
Consider Power Tools for Big Jobs
For large, fully glued rooms, a rented power scraper or an oscillating tool with a scraper blade can save hours. Let the tool do the work and keep the blade at a low angle.
How to Clean and Prepare the Subfloor
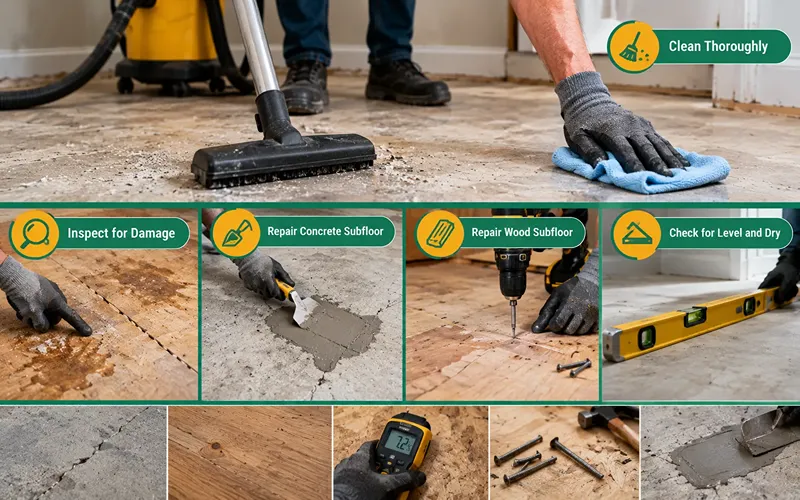
A clean, smooth subfloor is the foundation of a good new floor. Don’t rush this stage.
Clean Thoroughly
Vacuum the entire area to remove dust, debris, and small bits of vinyl. Then wipe it down with a damp (not wet) cloth. If you used a chemical remover, follow the manufacturer’s instructions for neutralizing and cleaning the surface.
Inspect for Damage
Look closely for cracks, holes, soft spots, and water stains. On wood subfloors, press down in different areas and listen for squeaks or flexing. Soft or spongy spots may point to rot and need replacing.
Repair a Concrete Subfloor
Fill cracks and small holes with a concrete patching compound. If the floor has dips or high spots, a self-leveling compound can even it out. It’s also wise to check for moisture before installing new flooring, especially in basements or on ground floors.
Repair a Wood Subfloor
Drive in any raised nail heads, and add screws where boards squeak or move. Fill gouges with a floor patch and sand high spots smooth. Replace any damaged or rotted sections.
Check That the Floor Is Level and Dry
Run a long straightedge across the floor to find uneven spots. Most new flooring manufacturers list how flat the subfloor must be, so check their instructions. Finally, make sure everything is fully dry before installing anything new.
Common Mistakes to Avoid
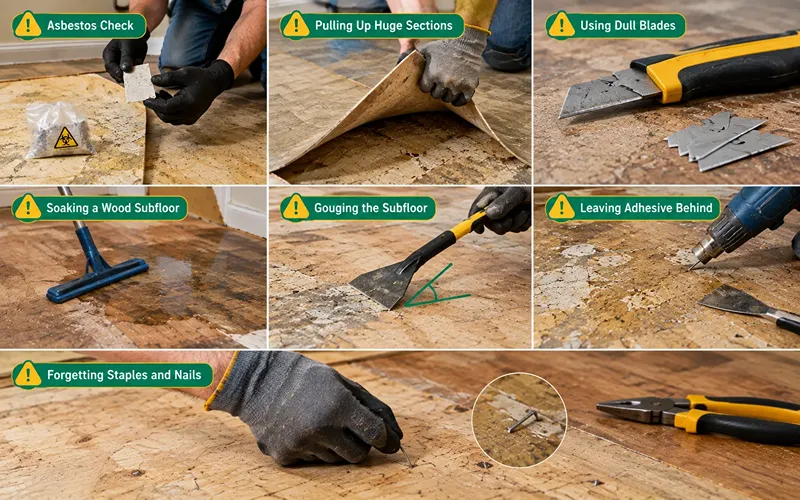
Skipping the asbestos check. This is the most serious mistake. If there’s any chance your vinyl or glue is old, test before you disturb it.
Pulling up huge sections. Large sheets tear unevenly and leave more backing on the floor. Narrow strips are faster in the long run.
Using dull blades. A dull knife or scraper takes more force, slips more often, and gouges the subfloor. Replace blades frequently.
Soaking a wood subfloor. Hot water works on concrete, but flooding plywood can cause swelling and mold.
Gouging the subfloor. Holding the scraper too steep digs into the surface and creates extra repair work. Keep it at a low angle.
Leaving adhesive behind. Old glue creates bumps under new flooring and can react with new adhesive. Take the time to remove it.
Forgetting staples and nails. A single leftover staple can show through or puncture new vinyl. Run your hand over the floor to find them.
Helpful Safety Tips
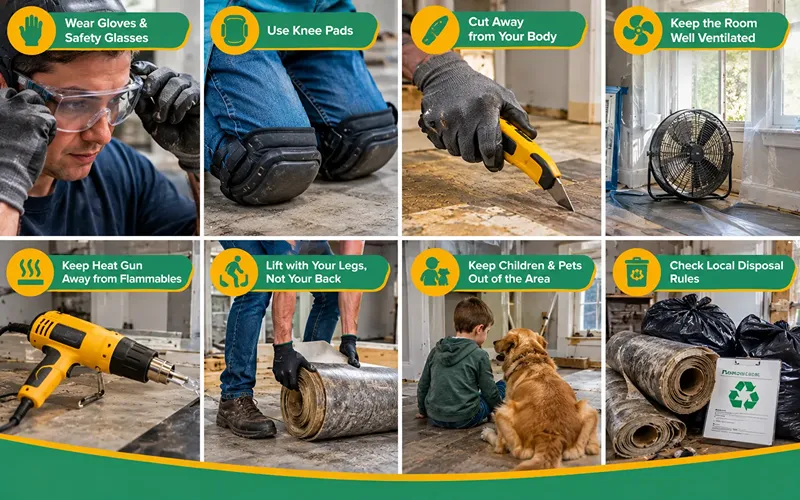
Keep these points in mind throughout the project:
- Wear gloves and safety glasses the whole time. Utility knives and scraper blades are very sharp, and vinyl edges can cut skin.
- Use knee pads. You’ll spend a lot of time kneeling, and hard floors are tough on joints.
- Always cut away from your body, and retract or cover blades when you set them down.
- Keep the room well ventilated when using heat or chemical products.
- Keep a heat gun away from flammable materials, and let it cool fully on a safe surface before storing it.
- Lift rolled vinyl strips with your legs, not your back. Keep bags light enough to carry comfortably.
- Keep children and pets out of the work area until cleanup is complete.
- Check your local rules for disposal. Some areas have specific requirements for flooring waste, and asbestos-containing material always needs special handling.
Final Thoughts
Learning how to remove vinyl flooring comes down to three things: knowing what type of floor you have, working in small sections, and taking your time with the adhesive. Rushing usually means more scraping, more repairs, and a longer project overall.
Start with an asbestos check if your floor is older, prepare the room properly, and follow the steps above. With a clean, level subfloor underneath, your new flooring will go down more easily and look better for years to come.
Frequently Asked Questions
How long does it take to remove vinyl flooring?
It depends on the floor type and room size. Floating click-lock floors can come up in an hour or two. Perimeter-bonded sheet vinyl in an average room usually takes half a day. Fully glued floors with lots of adhesive can take a full day or longer, mainly because of glue removal.
What is the easiest way to remove vinyl flooring?
The easiest approach is to cut the vinyl into narrow strips and peel them back slowly. For glued sections, use a long-handled scraper and apply heat where the adhesive is stubborn. Click-lock floors are the easiest of all, since they simply unlock row by row.
Can I remove vinyl flooring without damaging the subfloor?
Yes, in most cases. Cut carefully so the knife doesn’t go too deep, keep your scraper at a low angle, and avoid soaking wood subfloors. Minor scratches are normal and can be patched before installing new flooring.
Can I install new flooring over old vinyl?
Sometimes. If the old vinyl is a single layer, firmly attached, flat, and free of damage, some new floors can go over it. Check the new flooring manufacturer’s instructions first. Covering is also a common option when old vinyl contains asbestos.
How do I remove old vinyl floor glue?
Start by scraping dry. If that doesn’t work, soften the glue with a heat gun or warm, soapy water, then scrape again. For the toughest residue, use a commercial adhesive remover made for flooring. Always test black adhesive for asbestos before working on it.
Can I reuse vinyl flooring after removing it?
Click-lock and loose-lay planks can often be reused if you remove them carefully. Glue-down tiles and sheet vinyl usually tear or stretch during removal and aren’t worth reusing.
How do I dispose of old vinyl flooring?
Roll strips tightly, place them in heavy-duty contractor bags, and follow your local waste rules. Small amounts often go in regular household trash. Larger renovations may need a dumpster rental. Some manufacturers and recycling programs accept vinyl flooring, so it’s worth checking.