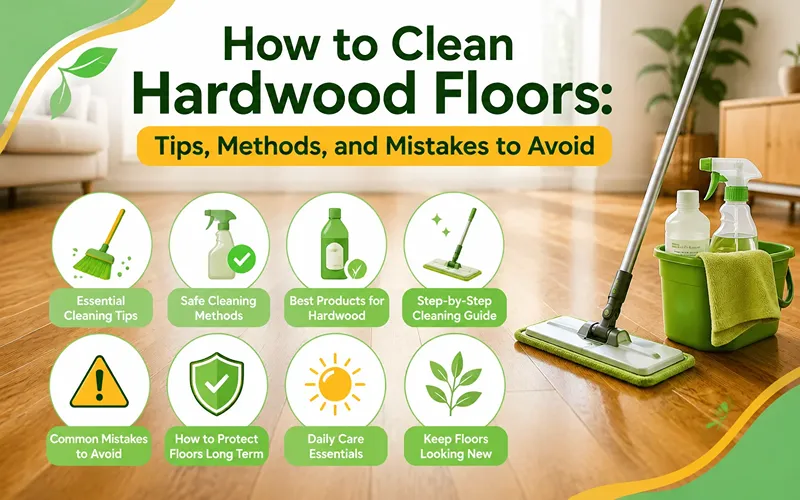
Hardwood floors are one of the few things in a house that can look better after twenty years than they did after two. But that only happens if they are cleaned the right way.
The tricky part is that most floor damage does not come from neglect. It comes from cleaning. Too much water, the wrong spray, a steam mop borrowed from a friend, a vinegar mix someone recommended online. The floor looks fine for a while, then the shine goes flat and the boards near the sink start to look tired.
This guide walks through how to clean hardwood floors properly: the tools that matter, a routine that takes minutes, what to do about spills and stains, and the habits that quietly wear floors down.
First, Know What Finish You Have
Before you clean anything, find out what is sitting on top of your wood. The finish decides everything else.
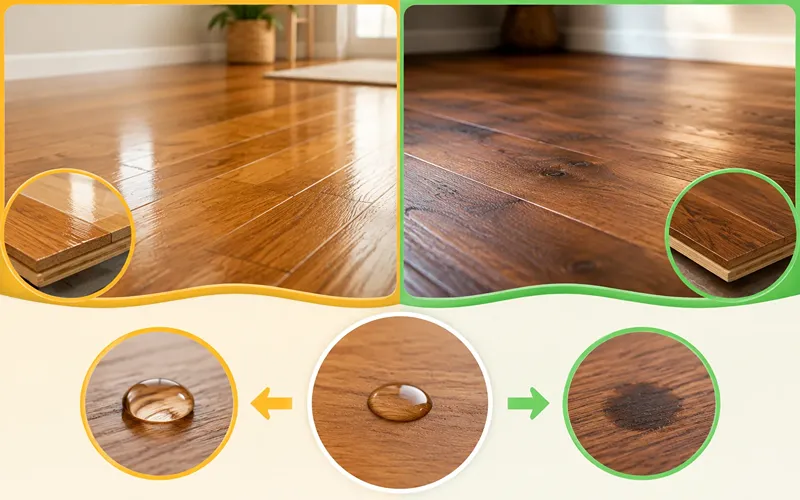
Surface-sealed floors are coated with polyurethane, urethane, or a similar sealant. The wooden flooring is protected by a hard, water-resistant layer. Almost every floor installed in the last thirty years is sealed this way, and these are the easiest to care for.
Penetrating oil or wax finishes soak into the wood instead of sitting on it. They are common in older homes and in some modern matte and hand-scraped floors. These need oil soaps or wax made for the job, and they should never be cleaned with water-based floor sprays.
The water drop test
Put a single drop of water in a low-traffic corner and wait five minutes.
- If it beads on the surface, your floor is sealed.
- If it soaks in and leaves a dark spot, you have an oiled or waxed floor.
Take thirty seconds to do this. It saves people from ruining a floor with the right product used on the wrong surface.
Also check whether your floors are solid wood or engineered. Both are cleaned the same way day to day, but engineered planks have a thin real-wood top layer, so they tolerate even less standing water and can only be refinished once or twice, if at all.
What You Need
You do not need a cupboard full of supplies. Five things cover almost everything:
- A soft-bristle broom or a microfiber dust mop
- A vacuum with a hard-floor setting or a bare-floor attachment, and the beater bar switched off
- A flat microfiber spray mop with washable pads
- A hardwood flooring in Dubai cleaner made for your finish
- A few clean microfiber cloths for spills and spot cleaning
Two extras worth having: a plastic putty knife or an old credit card for scraping dried gunk, and a spare mop pad so you are never cleaning a large area with a dirty one.
Cleaning Methods for Hardwood Floors
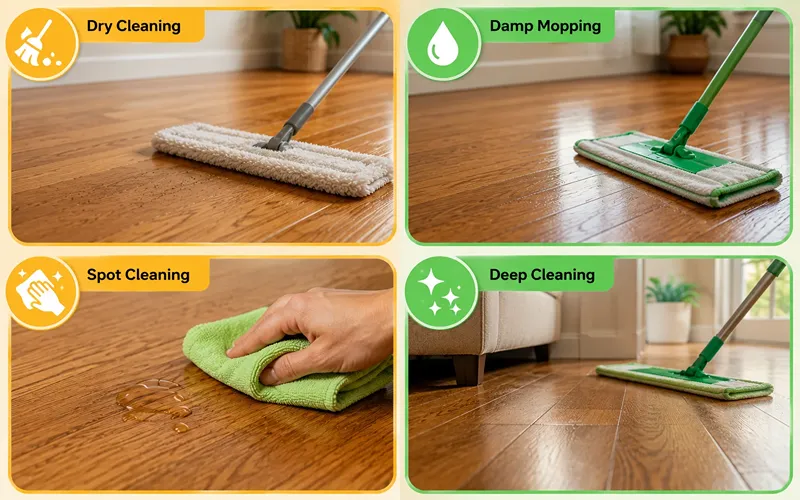
There are really only four, and each has its place.
Dry cleaning
Sweeping, dust mopping, or vacuuming. This is the most important thing you do for your floors and the most skipped. Grit is abrasive. Every step grinds sand and dirt into the finish like fine sandpaper, and those micro-scratches are what make a floor look dull long before it is actually worn out.
Microfiber dust mops beat brooms here. A broom pushes fine dust around; microfiber traps it.
Damp mopping
A lightly moistened microfiber pad with a wood-safe cleaner. This handles the film of oils, food residue, and footprints that dry cleaning leaves behind. The word to hold onto is damp. The floor should look barely misted and be dry within a minute or two.
Spot cleaning
A cloth, a little cleaner, and your hand. Faster than mopping a whole room because someone dripped coffee in the hallway.
Deep cleaning
Once or twice a year, work in small sections with a wood-floor cleaner and light pressure, getting into corners, along baseboards, and under furniture you normally skip. This is also the moment to look at the floor honestly and decide whether it needs a fresh coat of finish.
How to Clean Hardwood Floors: Step by Step
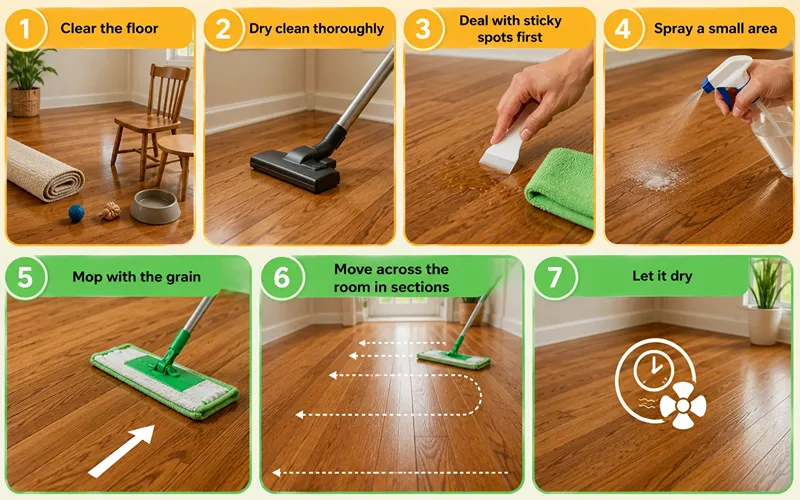
Step 1: Clear the floor
Move chairs, small tables, rugs, pet bowls, and toys. Half the point of a proper clean is reaching the places you usually mop around.
Step 2: Dry clean thoroughly
Dust mop or vacuum the whole area, including corners and along the baseboards where hair and grit gather. If you skip this, you are about to spread mud with a wet mop.
Vacuum on the hard-floor setting with the brush roll off. A spinning beater bar can scratch wood, and hard plastic wheels on some models leave marks of their own.
Step 3: Deal with sticky spots first
Scrape dried food or drips with a plastic scraper, then soften what is left with a barely damp cloth. Never use a metal blade or an abrasive pad.
Step 4: Spray a small area
Mist the cleaner over roughly a three-by-three-foot section, or spray the mop pad directly. Do not spray the whole room and then start mopping. Cleaner that sits on wood has time to seep into seams.
Step 5: Mop with the grain
Work the microfiber pad along the direction of the boards, not across them. Cleaning with the grain pulls residue out of the tiny gaps between planks instead of pushing it in.
Step 6: Move across the room in sections
Spray, mop, move on. Start at the far corner and work toward the door so you are not walking over what you just cleaned. Swap or rinse the pad when it looks grey.
Step 7: Let it dry
A properly damp-mopped floor dries in a minute or two. If it is taking longer, you used too much liquid. Turn on a fan or wipe the surface with a dry microfiber cloth. Keep pets and kids off until it is dry, and put rugs back only once the floor is completely dry underneath.
Wash mop pads afterward in warm water without fabric softener, which coats the fibers and ruins their grip. Hang them to dry.
Daily and Weekly Maintenance
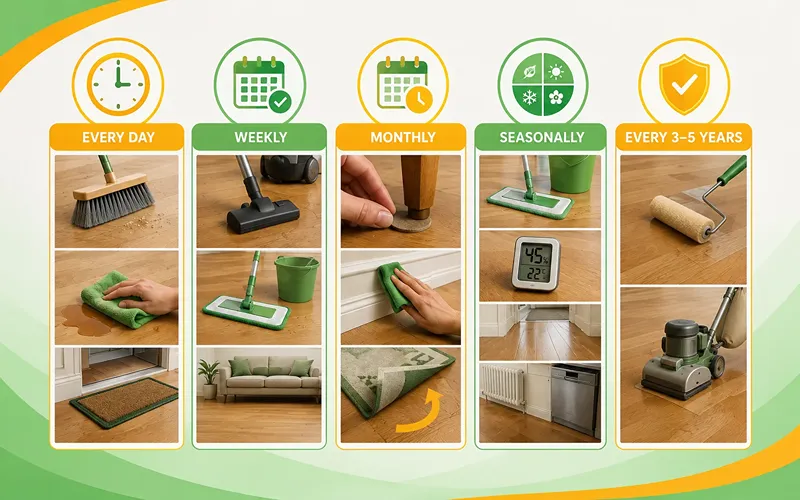
A routine beats a deep clean every time. Small, frequent care keeps hardwood looking new with a fraction of the effort.
Every day (two to five minutes) Sweep or dust mop entryways, hallways, and the kitchen. Wipe spills as soon as they happen. Shake out doormats.
Weekly Vacuum the whole floor, including under furniture and along edges. Damp mop the busy rooms with a wood-safe cleaner. Quieter rooms like bedrooms can go two weeks between mops.
Monthly Check felt pads under furniture legs and replace worn ones. Wipe baseboards. Rotate rugs so the floor underneath ages at the same rate as the rest.
Seasonally Deep clean. Check indoor humidity. Look over high-traffic paths for wear, and inspect the areas near exterior doors, radiators, and the dishwasher, where damage usually starts.
Every three to five years Consider a fresh coat of finish on heavily used floors. A full sand and refinish is usually a once-a-decade job, and only for solid wood or thick-veneer engineered planks.
Stains and Spills: What Actually Works
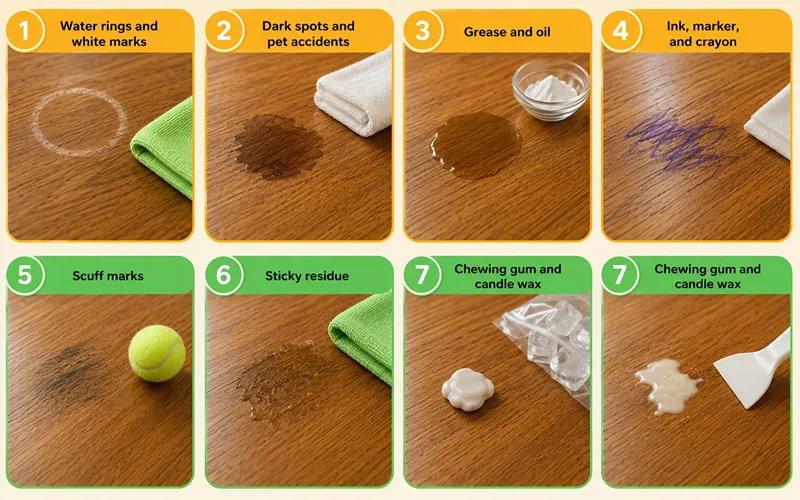
Speed matters more than technique. Almost every stain on a sealed floor is easy while it is wet and hard once it has soaked in.
Water rings and white marks
White or cloudy marks mean moisture is trapped in the finish, not the wood. Try rubbing the spot gently with a dry microfiber cloth first. If it stays, a small amount of non-gel toothpaste or baking soda paste on a soft cloth, rubbed lightly with the grain, often lifts it. Wipe clean and dry right away.
Dark spots and pet accidents
Dark stains mean liquid reached the wood. Blot up everything you can immediately, then clean with a wood-safe cleaner and dry the area. Pet urine is worse than water because it is acidic and soaks into the grain fast. If a dark ring has already set, cleaning will not remove it. That spot needs sanding and refinishing.
Grease and oil
Blot, do not wipe, or you spread it. Sprinkle baking soda or cornstarch over the spot and let it draw out the oil for fifteen minutes. Vacuum it up, then clean the area normally.
Ink, marker, and crayon
Test in a hidden spot first. A cloth barely dampened with rubbing alcohol usually lifts ink from a sealed floor. Crayon often comes off with a plastic scraper and a little gentle heat from a hairdryer held well back. Clean and dry the area afterward.
Scuff marks
A clean tennis ball or a pencil eraser removes most black shoe scuffs with a few rubs. No chemicals needed.
Sticky residue
Warm, damp cloth, held on the spot for a few seconds to soften it, then wiped away. Patience beats scrubbing.
Chewing gum and candle wax
Harden it with an ice pack in a plastic bag, then lift the edge with a plastic scraper. Never pull at it while it is soft.
Products That Are Safe for Hardwood
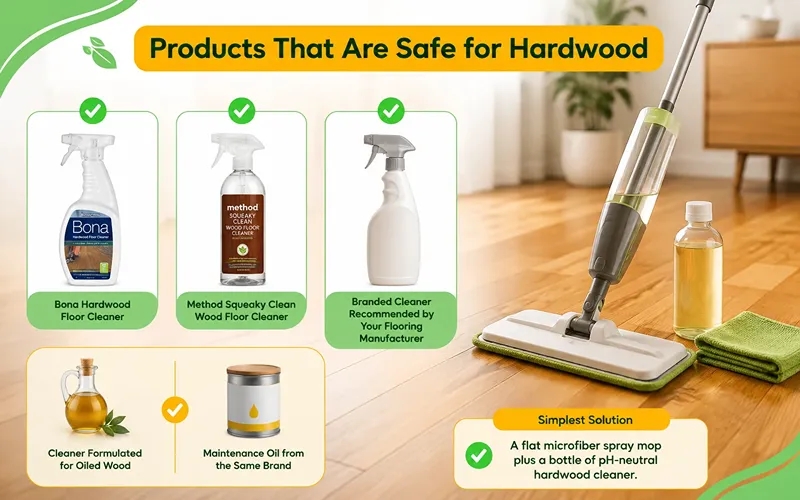
Look for a cleaner that says it is pH-neutral and made for wood floors, and that dries without residue. Well-known options include Bona Hardwood Floor Cleaner, Method Squeaky Clean Wood Floor Cleaner, and the branded cleaner recommended by your flooring manufacturer. Many manufacturers name a specific product in their warranty documents, and using something else can affect your coverage, so it is worth checking.
For oiled or waxed floors, use a cleaner formulated for oiled wood, or the maintenance oil from the same brand as your finish.
If you want the simplest possible answer: a flat microfiber spray mop plus a bottle of pH-neutral hardwood cleaner handles about ninety percent of hardwood floor cleaning.
Products and Tools to Avoid
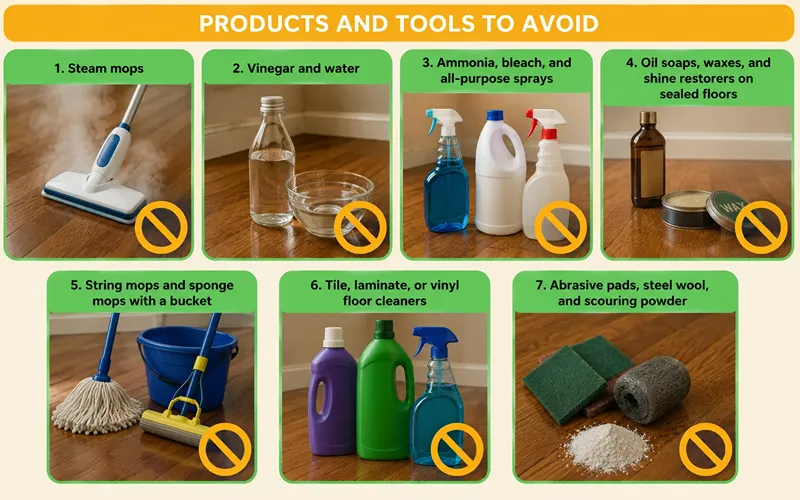
This list matters more than the one above. Most hardwood damage traces back to one of these.
Steam mops. Heat plus moisture is the fastest way to push water into seams, cloud a finish, and cause boards to cup or gap. Most flooring manufacturers void the finish warranty if a steam mop is used, even the ones marketed as wood-safe.
Vinegar and water. The most repeated hardwood tip online, and one of the worst. Vinegar is acidic and slowly eats away at polyurethane, leaving floors dull. There is no dilution that makes it a good long-term choice.
Ammonia, bleach, and all-purpose sprays. Too harsh. They strip protective coatings and can discolor wood.
Oil soaps, waxes, and shine restorers on sealed floors. These build up into a hazy, slippery film that gets worse with every application, and the buildup causes real problems later because new finish will not bond to it. Save oil soap for genuinely oiled floors.
String mops and sponge mops with a bucket. They hold far too much water and dump most of it on your floor.
Tile, laminate, or vinyl floor cleaners. Different surfaces, different chemistry.
Abrasive pads, steel wool, and scouring powder. They scratch finish permanently.
Common Mistakes to Avoid
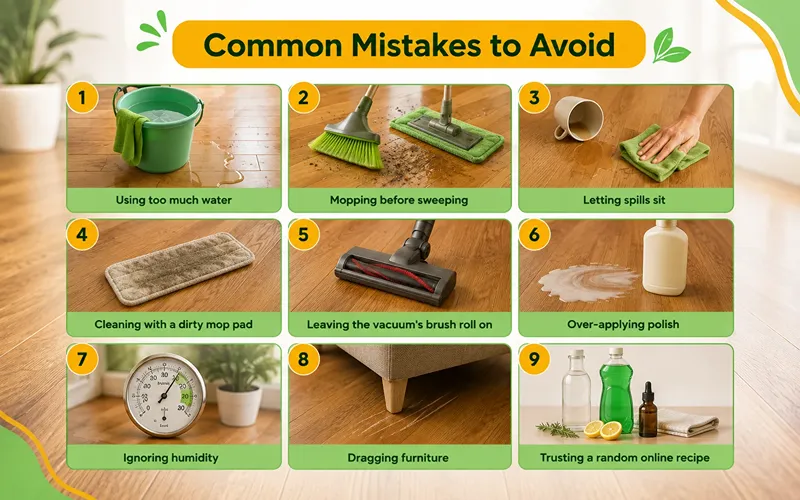
Using too much water. The single biggest cause of hardwood damage. Wood swells, seams open, and edges cup. Damp is the goal, never wet.
Mopping before sweeping. You end up dragging grit across the surface with a wet pad, which scratches more than walking on it would have.
Letting spills sit. A ten-second wipe now prevents a refinishing job later.
Cleaning with a dirty mop pad. After a room or two, the pad is redistributing dirt rather than removing it.
Leaving the vacuum’s brush roll on. It is designed for carpet fibers, and on wood it scratches.
Over-applying polish. Polish builds up, dulls over time, and complicates future refinishing. If the floor looks dull, buffing usually solves it.
Ignoring humidity. Wood moves with the seasons. Very dry winter air causes gaps; humid summers cause swelling. Keeping indoor humidity roughly between 35 and 55 percent prevents most seasonal movement.
Dragging furniture. One slide across a room can leave a scratch that only refinishing will remove.
Trusting a random online recipe. Homemade mixes with vinegar, dish soap, or essential oils feel harmless and cause slow, cumulative damage.
How to Protect Hardwood Floors Long Term
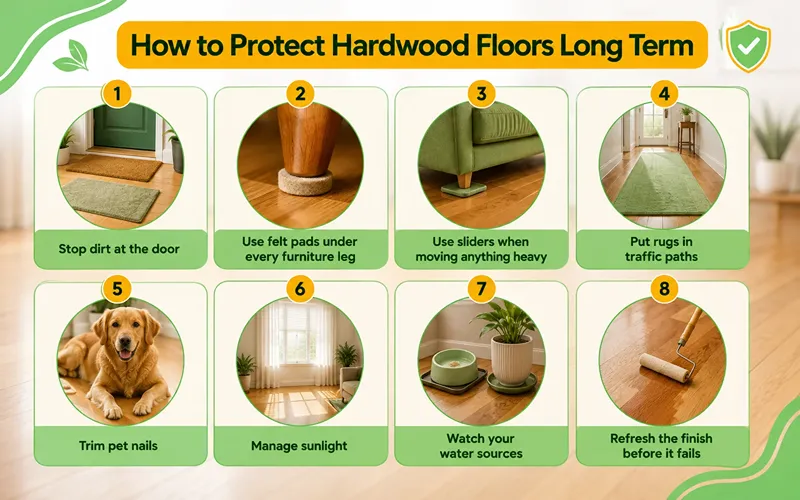
Cleaning keeps floors looking good. Protection is what makes them last.
Stop dirt at the door. Put a coarse mat outside and a soft absorbent one inside every entrance. Most of the grit that scratches floors walks in on shoes. A no-shoes-inside rule is the cheapest floor protection there is.
Use felt pads under every furniture leg. Check them a few times a year. A pad that has worn through or picked up a piece of grit becomes a scratching tool.
Use sliders when moving anything heavy. Lift or slide, never drag.
Put rugs in traffic paths. Hallways, in front of the sink, under dining chairs, and at the bottom of stairs. Use rug pads made for hardwood, since some rubber backings can discolor a finish.
Trim pet nails. Long nails leave a permanent pattern of fine scratches in a dog’s usual route through the house.
Manage sunlight. Direct sun fades and ambers wood unevenly. Blinds, sheer curtains, or UV film help, and moving rugs and furniture occasionally keeps the color even.
Watch your water sources. Dishwashers, fridges with ice makers, potted plants, and pet bowls are the usual suspects behind a mystery dark patch. Put trays under plants and bowls, and check under appliances now and then.
Refresh the finish before it fails. Recoating a worn but intact finish is far cheaper and less disruptive than a full sand and refinish. Waiting until the wood itself is exposed removes that option.
The Short Version
Sweep often, mop lightly, wipe spills right away, and keep steam and vinegar far away from your wood. Put mats at the doors and felt pads under the furniture.
That is genuinely most of it. Hardwood floors are not high maintenance, but they are unforgiving about the wrong kind of maintenance. Get the basics right and your floors will outlast almost everything else in the house.
Frequently Asked Questions
How often should I mop hardwood floors?
Once a week for kitchens, hallways, and living areas. Bedrooms and low-traffic rooms are fine every two weeks. Sweeping or dust mopping should happen far more often, ideally daily in busy areas.
Can I use vinegar on hardwood floors?
It is best avoided. Vinegar’s acidity gradually breaks down polyurethane and other sealants, leaving floors looking dull and cloudy. A pH-neutral hardwood cleaner does the same job without the damage.
Is steam cleaning safe for hardwood floors?
No. Steam forces heat and moisture into the finish and the seams between boards, which can cause clouding, warping, and separation. Most manufacturers treat steam cleaning as grounds for voiding the finish warranty.
Can I use dish soap and water?
A tiny amount of dish soap in a large amount of water will not usually cause immediate harm, but soap tends to leave a film that dulls the floor over time. It is not worth the tradeoff when a proper cleaner is inexpensive.
Is cleaning engineered hardwood different from solid hardwood?
The routine is identical, since both usually have the same type of surface finish. The difference is tolerance. Engineered planks have a thin real-wood wear layer, so standing water is even riskier and refinishing options are limited. Be extra careful with moisture.
How do I make dull hardwood floors shine again?
Start with a proper clean, because dullness is often just built-up residue from old polish, oil soap, or vinegar. If the floor is clean and still flat-looking, the finish is worn. A hardwood polish designed for your finish can help temporarily, and a professional recoat restores it properly.
What should I do about deep scratches?
Light surface scratches often disappear with a scratch-concealing product or a touch-up marker matched to your floor color. Scratches that go through the finish into the wood need spot repair or refinishing. If several boards are affected, get a professional opinion before trying a DIY fix.